You can access Autoassign through this button:

The following window appears:
The Autoassign dialog is from where you execute the Autoassign Templates. Before you start the process, you open the Rosters and load the same Period, Human Resources, and Roster blocks as you have in the Autoassign template.
Note: The Optimizer requires that VcRedist64 (2015-2019) is installed on the PC: https://support.microsoft.com/en-us/help/2977003/the-latest-supported-visual-c-downloads.
Settings
You can save all the parameters.

General
Field | Description |
| Save on Submit | This function is deactivated for Rosters. For Roster Patterns, it must be selected. The result is saved in an external file. |
| E-mail when complete | If you have an active COM channel, you can generate an email to notify when the result is ready. |

Dates
Specify the From/To for Roster.
Data Source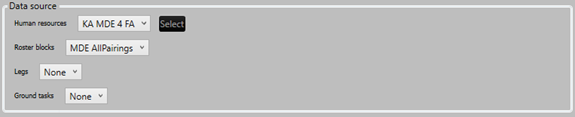
Field | Description |
| Human resources | HR filter or individual selection. See below for more functions. |
| Roster blocks | Block filters. See below for more functions. |
| Legs | Not implemented. |
| Ground tasks | Not implemented. |
Rostering

Field | Description |
| Should validate constraints | This function will check if all crew is feasible for the constraints. If some crew is not feasible, you will get a info box where you can select to continue without the problem crew. |
Autoassign Process
When you start the process, you will see a window split into two. The left window show the process and will errors that has caused the optimization to stop. The right window has two tabs:
- Solver - Show a graph of the optimization time.
- Stop solver button - Will stop the solver at the last achieved solution.

Results
The result window has two sections: Solution statistics and Crew statistics. The result can be saved in a XLS file.
Human Resources
It is possible to run with individual selections of crew.
From the Human resources, click the Select button. A new window opens from where you can select the crew.
Use any of the filters or mark crew individually. Click the Select button and the selected crew will be shown.
Note: The display name is the Shortcode name. Make sure that the filter selection is set to Auto detect.
Roster Blocks

It is possible to run Auto rostering with individual selections of Pairings.
- Mark the pairings in the Roster Block Gantt.
- Open the AR wizard.
- Click the Roster Blocks Select, and the pairings will be added. Note: Roster Blocks selection must be set to None.
